
PET Silicone Tape for Cabinet Hinge Masking Before Powder Coating
Application Solutions · Powder-Coated Enclosures
PET Silicone Tape for Cabinet Hinge Masking Before Powder Coating
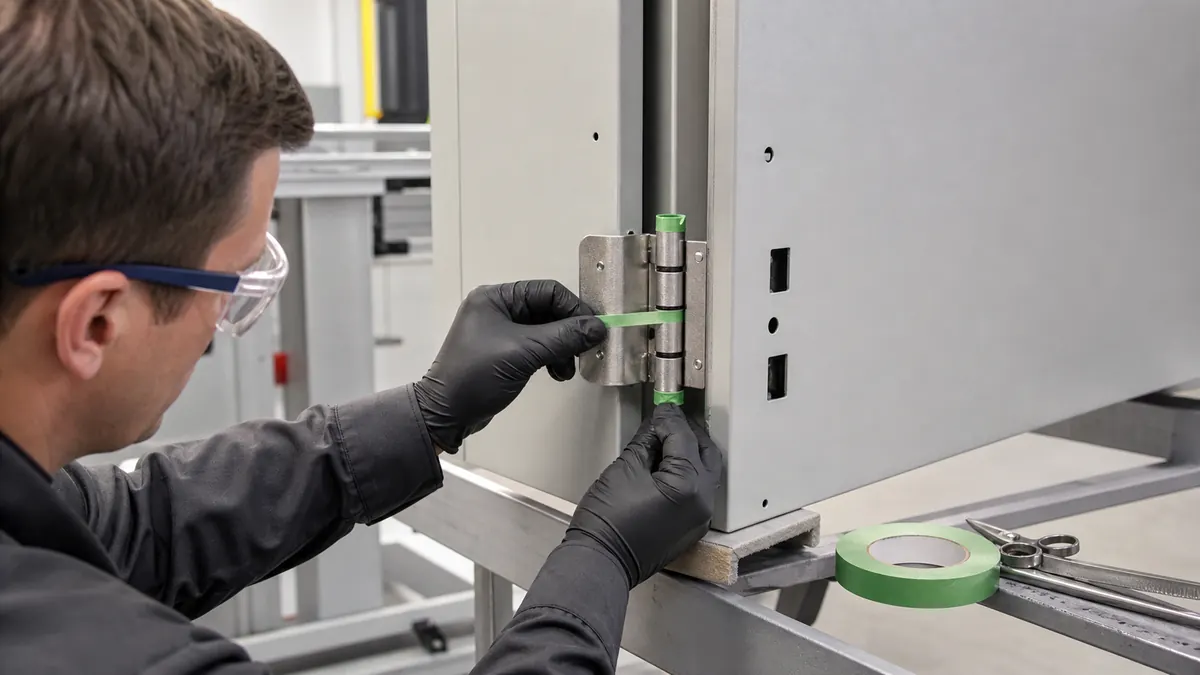
PET silicone tape for cabinet hinge masking can protect a released no-coat boundary around hinge knuckles, pins, bearing faces, and assembly clearances before powder coating. The masking plan must follow the cabinet drawing and hinge design: tape is a temporary process aid, not a substitute for correct hinge selection, grounding, lubrication, or final movement checks.
Keep defined hinge interfaces free of coating
Edge lift, powder bridging, or reduced hinge clearance
Mask boundary, tape construction, overlap, and removal stage
Coating edge, residue, motion, fit, and corrosion plan
Quick Answer
Use PET silicone masking tape only on hinge surfaces that the released drawing identifies as coating-free. Typical candidates include a controlled band around a hinge pin, a bearing or rotating interface, a removable-pin access zone, or a defined assembly land. Keep the tape edge away from the visible coating boundary when practical, press the perimeter without stretching the PET film, and qualify the complete heat and removal cycle on the actual hinge and enclosure finish.
Define the Hinge No-Coat Boundary
Cabinet hinges vary widely. A continuous piano hinge, three-knuckle butt hinge, lift-off hinge, concealed hinge, and welded hinge do not share the same masking geometry. Before choosing tape width, identify which surfaces rotate, carry load, establish door alignment, receive a later fastener, or form part of the corrosion-protection system.
Do not mask an area merely because powder on the hinge appears inconvenient. A broad bare-metal zone can reduce coating coverage, while coating on a close-clearance interface can change movement. Engineering must decide the allowed boundary, including whether the hinge is coated assembled, coated as separate leaves, or installed after coating.
| Hinge feature | Possible masking purpose | Required design check |
|---|---|---|
| Pin end or removal access | Preserve service access and avoid powder lock | Pin retention method and removal direction |
| Knuckle interfaces | Keep rotating clearances free of coating buildup | Gap, movement, lubrication, and wear plan |
| Leaf mounting land | Control stack height or maintain a released interface | Fastener, weld, gasket, or seal requirements |
| Visible transition | Create a repeatable coating edge | Appearance standard and corrosion coverage |
| Ground or test point | Preserve a separately specified contact area | Electrical design and released continuity test |
Select the Complete PET Silicone Tape Construction
Backing and adhesive work together
PET film provides a thin, dimensionally stable mask face. Backing thickness influences handling, stiffness, tear resistance, and the coating step at the edge. The silicone pressure-sensitive adhesive controls initial hold, heat response, and removal from the specific metal, pretreatment, or prior finish. Specify the approved product code rather than a generic “green high-temperature tape.”
Use the actual thermal history
Record pretreatment drying, oven setpoint, measured metal temperature, dwell, repeat passes, cooling, and the planned time before removal. A hinge pin, thick welded leaf, and thin enclosure sheet may heat and cool at different rates. Supplier data is useful for screening, but production qualification must reproduce the real part and line.
Match format to production volume
Narrow slit rolls can suit prototypes and mixed hinge sizes. Kiss-cut strips, tabs, or shaped masks on a liner can improve repeatability when the same boundary is applied at volume. A converting drawing should define length, width, corner shape, split liner, pull tab, and permitted overlap.
| Selection input | What to document | Why it matters |
|---|---|---|
| Hinge and substrate | Metals, plating, welds, texture, oil, and pretreatment | Changes adhesion and residue risk |
| Thermal exposure | Measured part temperature, dwell, passes, and cooling | Screens film and adhesive together |
| Geometry | Pin diameter, knuckle length, gaps, corners, and access | Determines roll, strip, tab, or die-cut format |
| Removal | Sequence, part temperature, peel angle, and tooling limits | Affects tearing and coating-edge fracture |
| Acceptance | Boundary tolerance, residue, motion, fit, and appearance | Turns “clean removal” into measurable approval |
Design Tape Geometry Around Moving Interfaces
Avoid stretching a narrow strip around the pin. PET recovery force can pull at the edge during heat exposure. Use short controlled pieces, a liner-supported shape, or a split construction when compound geometry would otherwise force wrinkles. Place overlaps outside the most critical coating edge and away from a rotating contact path.
If the hinge is coated assembled, define whether tape bridges between the leaves. Bridging can hide a gap from powder but may also trap contamination or tear unpredictably when the door moves. If leaves are coated separately, fixtures and datums must preserve the intended boundary on both parts. In either case, do not allow adhesive to contact a bearing surface unless that contact has been qualified and can be inspected after removal.
Recommended Masking and Removal Workflow
- Confirm the released drawing. Identify every coated and uncoated hinge surface.
- Verify materials. Match the enclosure revision, hinge, tape code, powder system, and work instruction.
- Inspect the hinge. Reject burrs, sharp weld spatter, loose plating, heavy oil, or damage.
- Prepare the surface. Follow the approved cleaning and pretreatment sequence; mask only at the released stage.
- Apply from a datum. Align the tape without stretching and keep adhesive away from forbidden interfaces.
- Burnish the perimeter. Apply uniform pressure around edges, overlaps, and tabs.
- Inspect before coating. Check coverage, wrinkles, gaps, access, and rack clearance.
- Run the qualified cycle. Control handling and heat exposure within the released window.
- Remove as specified. Use the approved part temperature, direction, angle, and speed.
- Complete final checks. Inspect coating edges and residue, then verify hinge motion and door alignment.
Qualification and Production Validation
Build trials with the smallest and largest hinge variants, worst approved surface texture, hottest credible rack position, maximum dwell, and longest allowed delay before unmasking. Include realistic operator variation. Flat coupons can screen adhesion, but they cannot reproduce hinge gaps, weld heat mass, compound edges, or removal access.
- Measure the coating boundary against the drawing and appearance standard.
- Inspect for adhesive transfer, film fragments, powder creep, bridging, and edge chipping.
- Cycle the hinge through its required movement and verify door fit, alignment, and service access.
- Run any corrosion, continuity, torque, sealing, or durability checks defined by the product owner.
- Requalify changes to hinge supplier, tape grade, pretreatment, powder, oven, fixture, or removal stage.
Troubleshooting Common Hinge-Masking Defects
| Observed defect | Check first | Corrective direction |
|---|---|---|
| Powder locks the hinge | Boundary, gaps, tape lift, spray direction, and movement before cure | Revise the released mask geometry and coating sequence |
| Jagged coating edge | Stretch, wrinkles, rough welds, overlap, and powder bridge | Use a supported strip or die cut and improve the datum |
| Residue near the pin | Construction, contamination, heat history, pressure, and peel stage | Requalify tape and the removal window |
| Tape tears during removal | Burrs, trapped edges, access, backing thickness, and coating lock | Remove the damage source and add a controlled pull tab |
| Bare area is too large | Tape width, placement datum, operator method, and drawing clarity | Tighten the mask drawing or use a converted shape |
Frequently Asked Questions
Can PET silicone tape stop a cabinet hinge from being powder-locked?
It can protect a released no-coat area, but it cannot correct an unsuitable hinge clearance, coating sequence, or drawing. Validate the exact hinge, mask boundary, powder process, and final movement test together.
Should the hinge pin be completely wrapped?
Only if the released design requires that coverage. Complete wrapping may obstruct retention features or put adhesive into a moving interface. Define the protected band and removal access on the work instruction.
Is narrow roll tape or a die-cut mask better?
Narrow tape is flexible for prototypes and mixed sizes. A die-cut or kiss-cut strip can improve edge position, tab design, cycle time, and repeatability for stable production geometry.
When should masking tape be removed after powder coating?
Use a removal window established by the production trial and safety procedure. Part temperature, powder state, tape construction, access, and edge-chipping risk all affect the approved timing.
What information belongs in an RFQ?
Provide hinge and enclosure drawings, protected surfaces, substrate and pretreatment, powder and cure profile, tape format, quantity, removal stage, and acceptance tests.
Build a Controlled Cabinet-Hinge Masking Trial
Share the hinge geometry, coating boundary, metal finish, measured cure profile, masking sequence, removal condition, and inspection plan. JIAO TAO TAO can help shortlist a PET silicone tape width or converted mask for production evaluation.
Discuss the hinge masking application with the technical team.
Custom Die-Cut Tape for Parking Sensor Bracket Bonding
Custom Die-Cut Tape for Industrial Barcode Scanner Window Bonding
Related Article
Need help choosing the right industrial tape?
Send us your application details, including temperature, surface material, size, quantity and current problem. Our team will help recommend a suitable tape material or custom die-cut solution.

simon@jiaotaotao.com


+86-136 1277 5969


+86-136 1277 5969
