
Industrial Double-Sided Tape for Wiring Harness Clip Bonding
Buying Guides · Electrical Enclosure Assembly
Industrial Double-Sided Tape for Wiring Harness Clip Bonding
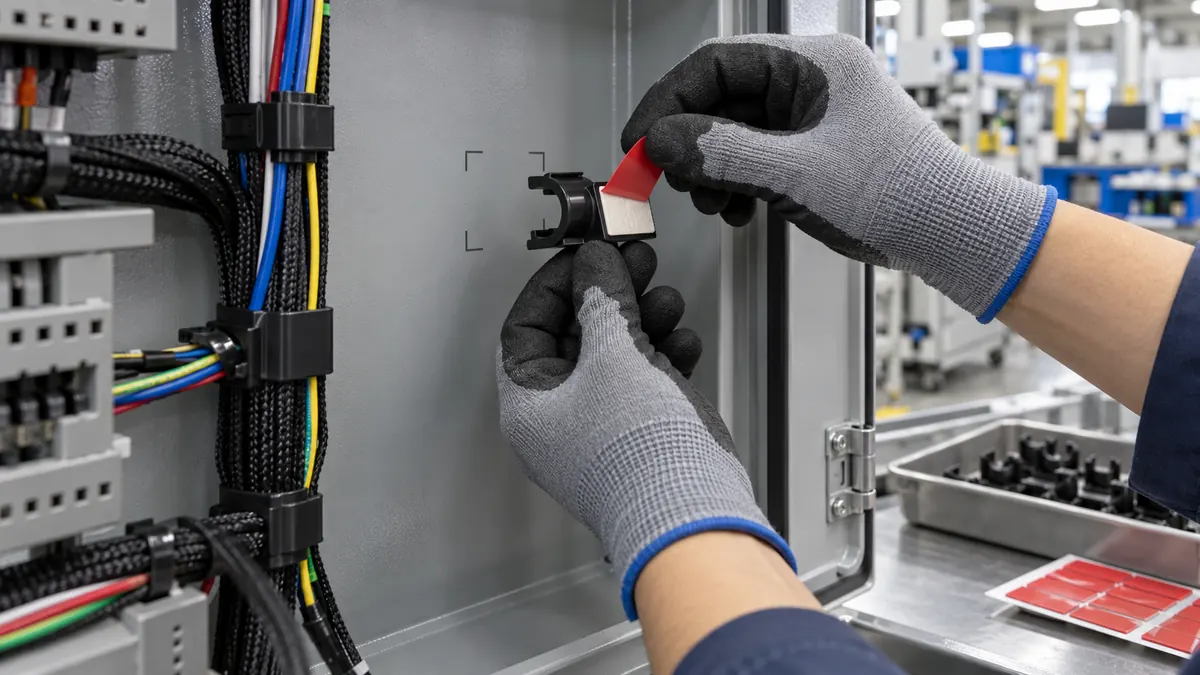
Industrial double-sided tape for wiring harness clip bonding can place cable clips inside an enclosure without drilling the panel, but the adhesive joint must be designed around clip material, coated-metal texture, harness load, cable routing, temperature, vibration, service access, and safety requirements. A convenient peel-and-stick clip is not automatically a released retention system.
Quick Answer
Start by defining what the clip must restrain and which loads reach the adhesive pad. A short light signal lead, a stiff braided harness, a moving door loom, and a cable bundle near a hot component do not share one tape requirement. Use bonded clips only where the equipment design and safety review permit them. Critical, suspended, moving, or safety-related harnesses may require mechanical retention or a redundant path.
Map the Wiring Harness Load Path
The adhesive should ideally carry controlled shear rather than continuous peel. Cable spring-back, a tight bend, connector weight, door motion, bundling tension, vibration, and service pulling can lever the clip away from the panel. Move the clip, increase bend radius, add slack, or use another retention method before selecting a stronger tape to fight a poor load path.
Document clip spacing and orientation on the harness drawing. Keep bonded clips clear of sharp edges, live parts, vents, fans, heat sources, drainage paths, grounding points, warning labels, and hardware access. Provide service slack so removing a connector does not load the nearest clip in peel.
| Load source | Design question | Potential response |
|---|---|---|
| Cable spring-back | Does the harness naturally pull away from the panel? | Increase bend radius, add slack, or reposition the clip |
| Harness mass | Is the clip supporting weight vertically or during transport? | Use shear-oriented pads, more supports, or mechanical retention |
| Door movement | Does repeated flexing reach the bonded base? | Add a controlled flex loop and strain relief |
| Vibration | Can the bundle pump, rub, or resonate? | Control spacing, preload, abrasion protection, and redundancy |
| Service pull | Will technicians tug the clip while disconnecting equipment? | Provide access, instructions, and a protected load path |
Evaluate Both Bonding Surfaces
Clip base
Wiring clips may use nylon, polypropylene, acetal, ABS, another molded polymer, or a metal base. Mold-release residue, texture, recycled content, curvature, ribs, and a small footprint can limit adhesive contact. Ask the clip supplier for the exact resin and base design; “plastic clip” is not enough for adhesive selection.
Enclosure coating
The panel may be smooth paint, fine-texture powder coat, coarse powder coat, plated metal, stainless steel, or a polymer housing. Texture reduces real contact area, while some coatings contain additives or low-surface-energy modifiers. Test production panels from representative coating lots rather than relying only on flat laboratory metal.
Cleaning and application condition
Define the approved cleaner, wipe material, drying time, surface temperature, tape conditioning, and maximum time between cleaning and bonding. Dust, oil mist, silicone contamination, fingerprints, and condensation can defeat an otherwise suitable construction. Any primer must be approved for the panel, clip, environment, and service process.
Compare Double-Sided Tape Constructions
| Construction | Potential fit | Watch points |
|---|---|---|
| Acrylic foam tape | Texture, small gaps, vibration damping, and a conformable bond line | Edge thickness, clip rocking, compression, and long-term shear |
| PE foam double-sided tape | Indoor clips and moderate texture where a soft foam is suitable | Temperature, fluids, foam split, and sustained load |
| PET film double-sided tape | Thin clips on smooth, well-matched surfaces | Limited texture compensation and concentrated peel |
| Tissue double-sided tape | Economical light-duty assembly on compatible smooth surfaces | Moisture, edge durability, handling, and service demands |
| Transfer adhesive | Very thin full-area pads and converted shapes | Handling, stretch, liner release, and base flatness |
Choose the thinnest construction that still wets out both real surfaces and tolerates the load path. Extra thickness may improve texture contact, but it can also let the clip rock, reduce clearance, or create a visible edge. Adhesive chemistry, carrier, total thickness, liner, and conversion quality must be specified together.
Design the Adhesive Pad and Liner
A die-cut pad should support the complete stable area of the clip base without protruding into a latch, slot, screw boss, drain, or cable-contact feature. Rounded corners can reduce snagging and local peel. A split liner or extended pull tab helps the operator position the clip without touching the adhesive or dropping removed liner inside the cabinet.
For automated or fixture-assisted placement, define pad orientation, liner stiffness, release level, pitch, roll direction, and presentation. For manual work, use a visible datum or placement fixture. Do not allow operators to peel and reposition a clip repeatedly; disturbance can reduce wet-out and trap contamination.
| Converted feature | Purpose | Qualification concern |
|---|---|---|
| Full-base pad | Maximize supported bond area | Air escape, flatness, and liner handling |
| Perimeter or segmented pad | Avoid ribs, slots, or functional openings | Reduced area and higher local stress |
| Rounded corners | Reduce exposed points that can start peel | Clip footprint and cutting tolerance |
| Split liner | Stage placement before full contact | Pull direction, liner fragments, and operator sequence |
| Finger-lift tab | Remove liner without touching adhesive | Tab must not remain trapped or enter the harness path |
Recommended Assembly Workflow
- Confirm the build record. Match enclosure, coating, harness, clip, tape pad, and placement drawing.
- Inspect both surfaces. Reject warped bases, burrs, oil, dust, loose coating, or visible mold release.
- Prepare by the approved method. Clean, dry, and condition the parts inside the qualified application window.
- Laminate the pad to the clip. Use even pressure without stretching, trapping air, or touching adhesive.
- Align from a datum. Use the drawing, fixture, or marked reference before exposing all adhesive.
- Apply final pressure. Press the complete base, including edges and corners, with the released tool.
- Allow required bond build. Protect the clip from harness load until the validated dwell has elapsed.
- Route without preload. Install the harness with the approved bend radius, slack, spacing, and strain relief.
- Inspect and account for liners. Confirm placement, contact, edge condition, and removal of every liner piece.
- Complete functional checks. Verify routing, clearances, door motion, service access, and released durability tests.
Validate the Clip and Harness Assembly
Use production clips, molded lots, tape pads, coated panels, cleaners, fixtures, operators, and harnesses. Include the heaviest and stiffest bundle, minimum bend radius, warm and cold application limits, shipping orientation, vibration, heat, humidity, cleaner exposure, door cycles, and service actions that matter to the equipment.
Define measurable failures: clip displacement, edge lift, adhesive or foam split, panel-coating delamination, harness abrasion, loss of clearance, contact with hot or live parts, and inability to service the assembly. If a bonded clip is not sufficient for the risk, revise the retention strategy rather than stretching the tape specification.
Related Products and Articles
Frequently Asked Questions
Can double-sided tape replace screws for wiring harness clips?
It can support suitable clips in approved applications, but the equipment owner must assess load, safety, service environment, redundancy, and failure consequences. Some harnesses still require mechanical retention.
Which tape works on textured powder coating?
A conformable foam construction is often screened first, but texture, coating chemistry, clip base, load, temperature, and available thickness determine the trial. Test actual production surfaces.
Why does a clip fall off after the harness is installed?
The bundle may apply continuous peel or spring-back before the adhesive has built bond. Check routing, bend radius, dwell, surface preparation, pressure, pad coverage, and temperature.
Should the clip be loaded immediately after bonding?
Only if the qualified assembly process allows it. Many pressure-sensitive adhesives build bond over time, so the work instruction should define when harness loading may begin.
What information belongs in a wiring-clip tape RFQ?
Provide the clip drawing and polymer, panel coating and texture, harness mass and routing, loads, environment, application method, available thickness, pad geometry, quantity, and validation plan.
Build a Wiring Harness Clip Bonding Trial
Share the clip base drawing and resin, enclosure coating, harness route and load, application temperature, cleaning method, thickness limit, liner preference, annual volume, and durability requirements. JIAO TAO TAO can prepare slit or die-cut industrial double-sided tape samples for assembly evaluation.
Discuss double-sided tape for harness clips
Rotary vs Flatbed Die Cutting for Adhesive Tape Parts
Related Article



Need help choosing the right industrial tape?
Send us your application details, including temperature, surface material, size, quantity and current problem. Our team will help recommend a suitable tape material or custom die-cut solution.

simon@jiaotaotao.com


+86-136 1277 5969


+86-136 1277 5969
