
Industrial Double-Sided Tape for Wiring Duct Mounting
Buying Guides · Control Cabinet Assembly
Industrial Double-Sided Tape for Wiring Duct Mounting
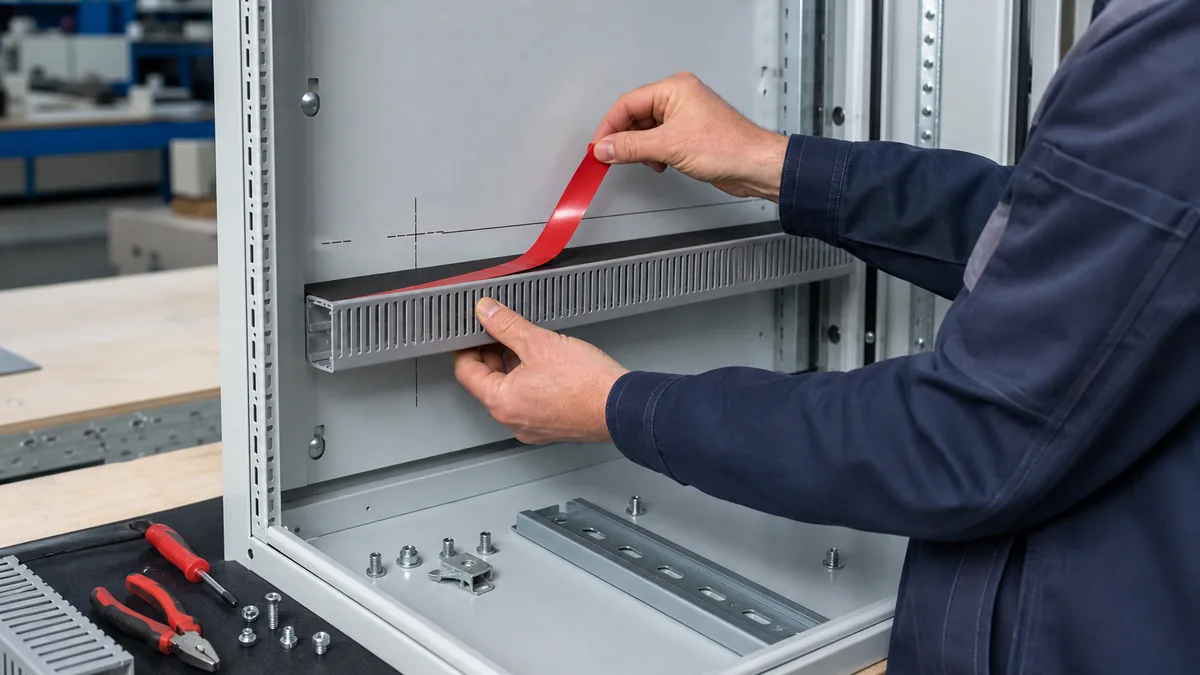
Industrial double-sided tape for wiring duct mounting can provide immediate positioning or a qualified bond between slotted duct and a control-cabinet backplate. Selection starts with the duct polymer, panel finish, load, service environment, mechanical-retention strategy, adhesive coverage, and assembly method—not with liner color or initial tack alone.
Quick Answer
Double-sided tape may be used as a temporary positioning aid, as a permanent bond in an approved design, or together with screws, rivets, clips, or molded mounting features. The cabinet designer must define that role before tape selection. The complete assembly must satisfy applicable electrical, mechanical, environmental, fire, service, and workmanship requirements; a tape data sheet alone cannot approve wiring-duct retention.
Define What the Tape Must Do
During panel assembly, tape can keep a long duct aligned while an operator installs mechanical fasteners. It can also eliminate a drilling step in a design specifically qualified for adhesive mounting. These are different duties. A placement aid needs reliable short-term hold and clean workflow; a permanent bond needs evidence across the full load and environment for the intended service life.
Document whether fasteners are mandatory, optional, or prohibited and who owns that decision. Do not remove specified fasteners simply because the tape feels strong during assembly. Safety-related cabinets, transport equipment, high-vibration machinery, hot enclosures, and overhead duct locations may require mechanical retention or a hybrid design.
| Attachment role | Typical purpose | Engineering question |
|---|---|---|
| Temporary positioner | Hold duct on datum before drilling or fastening | How long and under what handling load must it hold? |
| Hybrid attachment | Support alignment and distribute contact between fasteners | Which load is assigned to tape and which to hardware? |
| Permanent adhesive bond | Retain duct without visible fasteners in an approved design | Has the complete cabinet assembly been qualified? |
| Converted mounting strip | Speed repeatable placement with a controlled liner | Does coverage avoid slots, holes, labels, and service features? |
| Pre-laminated duct | Shift adhesive application to the duct supplier or converter | How are shelf life, packaging, and bond-surface cleanliness controlled? |
Understand the Duct and Cabinet Surfaces
Wiring-duct polymer
Slotted wiring duct may be made from PVC or another formulated polymer with processing aids, plasticizers, colorants, and surface texture. The flatness and available bonding land on the rear can vary by profile. Test the exact supplier and profile; a smooth rigid coupon does not reproduce narrow ribs, molded marks, curvature, or end stress.
Backplate finish
Cabinet backplates may be galvanized, painted, powder coated, plated, or made from stainless steel or aluminum. Texture and contamination reduce real adhesive contact. Fabrication oil, passivation, overspray, release material, dust, and fingerprints can all affect wet-out. Confirm an approved cleaning method that is compatible with both the panel finish and workplace controls.
Loads are not only the duct mass
Cables can pull on the duct fingers and cover during routing and service. Tight bundles, bend radii, ties, and wire exits can create peel at an end. Vertical mounting adds sustained shear; vibration, cabinet heating, and door movement may cycle the joint. Define cable loading and service actions before choosing tape thickness or adhesive.
| Design input | What to record | Why it matters |
|---|---|---|
| Duct | Material, supplier, profile, length, rear geometry, and mass | Controls available bond area and stiffness |
| Backplate | Metal, coating, gloss, texture, cleanliness, and flatness | Changes adhesive wet-out and edge gaps |
| Cable load | Bundle mass, fill, exits, cover use, pulling, and service access | Creates shear, peel, and impact loads |
| Environment | Temperature, humidity, vibration, chemicals, dust, and storage | Defines aging and compatibility trials |
| Orientation | Horizontal, vertical, overhead, and edge clearance | Changes the dominant load mode |
| Retention | Tape-only, hybrid, fastener spacing, and safety requirements | Establishes the approved attachment system |
Compare Double-Sided Tape Constructions
Acrylic foam or PE foam tape can conform to moderate texture and help distribute stress, but thickness may affect duct position and compression. PET film-carrier tape creates a thinner, stable bond line on well-matched smooth surfaces, with less ability to bridge coarse texture. Tissue tape can be economical and conformable for suitable indoor assemblies, while transfer adhesive offers a very thin layer but requires controlled lamination and handling.
Choose adhesive chemistry for both surfaces and the real environment. Initial tack is useful for assembly, yet long-term shear, peel resistance, temperature response, and compatibility matter for service. If the duct polymer or coating is difficult to bond, compare approved surface treatment or primer only within a controlled qualification plan.
| Tape family | Potential fit | Main watch point |
|---|---|---|
| Acrylic foam tape | Stress distribution, slight gaps, vibration, and textured surfaces | Thickness, compression, edge visibility, and sustained load |
| PE foam double-sided tape | Conformable mounting on compatible duct and panel surfaces | Foam strength, aging, temperature, and chemical exposure |
| PET film double-sided tape | Thin bond line on smooth, well-matched surfaces | Limited gap filling and edge peel on uneven profiles |
| Tissue double-sided tape | Cost-sensitive indoor assembly on compatible surfaces | Moisture, carrier split, and demanding service |
| Transfer adhesive | Very thin converted strips or full-area lamination | Handling, stretch, liner release, and placement control |
Design the Coverage Pattern and Liner
Full-length strips maximize continuous contact but can trap air and make repositioning difficult. Parallel strips can avoid molded ribs and service holes. End pads can address peel, but an abrupt pad edge can also concentrate stress. Put the coverage pattern on the drawing and keep adhesive clear of mounting slots, wire-entry openings, grounding features, labels, vents, and areas that must be serviced.
A staged or split liner lets the operator align the duct before exposing the entire adhesive. Add pull tabs that remain accessible without entering the finished cabinet. For pre-laminated duct, packaging should protect the liner and prevent bowing or contamination. Define strip location relative to the duct edge so the adhesive is not exposed.
Recommended Cabinet Assembly Workflow
- Work de-energized. Follow the cabinet assembly and electrical safety procedure.
- Confirm released materials. Match duct, backplate, tape, drawing, and retention hardware.
- Inspect the bond lands. Reject oil, dust, burrs, loose coating, warped duct, or damaged liner.
- Clean as approved. Use the documented method and allow complete drying.
- Laminate to the duct. Apply the specified strip pattern with uniform pressure and no stretch.
- Use placement datums. Mark or fixture the duct location, keeping required clearances.
- Peel the liner in stages. Expose only enough adhesive to establish initial alignment.
- Seat the duct. Apply controlled pressure across the full bonded area.
- Install required hardware. Complete screws, clips, rivets, or other released retention.
- Inspect and condition. Check placement, liner removal, bond contact, and specified dwell before loading.
Qualify the Finished Cabinet Assembly
Build test assemblies with production duct, panel coatings, cleaning, tape, pressure, and conditioning. Include the longest duct, difficult orientation, credible cable loading, service access, temperature range, humidity, vibration, transport, and chemicals that apply to the product. Use acceptance values owned by the cabinet designer rather than inventing a universal peel or shear threshold.
- Inspect initial alignment, full contact, exposed adhesive, and end lift.
- Load cables and covers using the released routing and service procedure.
- Check displacement, peel, foam split, residue, duct damage, and coating damage after exposure.
- Verify required clearances, grounding, labels, ventilation, and fastener installation.
- Place duct, panel coating, tape, cleaner, primer, liner, and hardware changes under formal change control.
Troubleshooting Wiring-Duct Bonds
| Observed issue | Check first | Corrective direction |
|---|---|---|
| Duct end lifts | End stress, duct bow, coverage, surface texture, pressure, and cable exits | Correct geometry or retention; do not add tape blindly |
| Tape bonds to duct but not panel | Coating texture, oil, cleaner residue, adhesive compatibility, and dwell | Requalify surface preparation and adhesive |
| Foam splits during service | Foam cohesive strength, prying load, heat, and removal method | Select for the real load or add approved retention |
| Duct moves while wiring | Conditioning time, roller pressure, cable-pulling load, and fastening sequence | Revise the assembly process or attachment role |
| Liner fragments remain | Split design, static, tear path, operator access, and packaging | Use a controlled liner and documented removal sequence |
Related Products and Articles
Frequently Asked Questions
Can double-sided tape replace wiring-duct screws?
Only in a cabinet design that explicitly permits and validates adhesive retention. Do not remove required screws, rivets, clips, or other hardware based on initial tack.
Which double-sided tape is best for powder-coated panels?
A conformable foam tape is often screened when texture reduces contact, while thinner film or transfer constructions may suit smoother panels. Test the exact coating and duct together.
Should tape cover the full length of the duct?
Not automatically. Coverage depends on the bond role, rear geometry, loads, holes, service features, and fastening plan. Put the qualified pattern on the drawing.
Why does wiring duct lift after cables are installed?
Cable mass, routing forces, cover loading, duct bow, end peel, short conditioning, or poor surface contact can exceed the attachment capability. Review the complete assembly.
What information belongs in an RFQ?
Provide duct material and profile, panel finish, dimensions, orientation, cable loading, tape role, coverage drawing, liner, assembly method, environment, hardware, quantity, and acceptance tests.
Plan a Controlled Wiring-Duct Mounting Trial
Share the duct profile and material, backplate finish, attachment role, cable-loading conditions, orientation, tape pattern, liner sequence, mechanical-retention plan, environment, and qualification method. JIAO TAO TAO can help shortlist a double-sided tape format for engineering evaluation.
Discuss wiring-duct mounting tapeIndustrial Double-Sided Tape for Polycarbonate Machine Guard Windows
Industrial Double-Sided Tape for Solar Junction Box Gasket Positioning
Related Article

Need help choosing the right industrial tape?
Send us your application details, including temperature, surface material, size, quantity and current problem. Our team will help recommend a suitable tape material or custom die-cut solution.

simon@jiaotaotao.com


+86-136 1277 5969


+86-136 1277 5969
